
LEGO Mindstorms
Lego Mindstorms provides a fantastic way to try programming for the first time. You'll need to download the software to get started. Then follow along with my videos to see how I made a basic program for my MrKingBot. Finally, to get a better understanding of what's possible, I suggest watching the tutorials in the links at the bottom of this page.
TUTORIALS
TUTORIALS
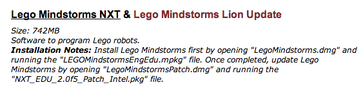
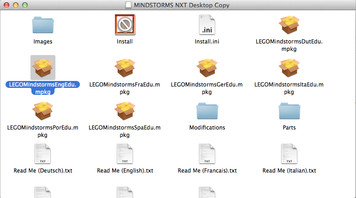
- Downloading Mindstorms from BSS
- Tutorials Creating an Example Program: MrKingBot (8 videos)
- More Tutorials - Essentials (7 videos)
1 - Downloading Mindstorms from BSS
|
|
|
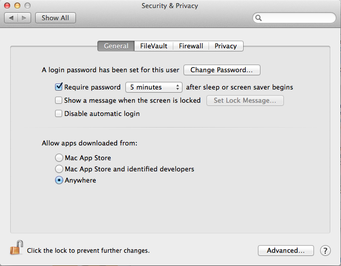
Note: if you get an error about being unable to download from an unidentified developer, here's how you fix it:
|
|
2 - Example Robot & Program: MrKingBot (8 Videos)
Part 1 - Getting to Know the Mindstorms SoftwareThis video shows an example of a finished (simple) Mindstorms program that I wrote for MrKingBot. You don't need to worry about understanding exactly how it works yet - our final program will be a little bit different anyways. The goal of this video is just to give you a sense of the software and what a program looks like.
Press Play or Watch on YouTube
|
|
Part 2 - Examining the MrKingBot: Motors and SensorsIn this video we look at the actual robot I built and learn the names and port numbers for each motor and sensor it has attached.
Press Play or Watch on YouTube
|
|
Part 3 - Moving ForwardIn this video we make a simple program that tells our robot to move forwards!
Press Play or Watch on YouTube
|
|
Part 4 - Using a Wait Block for a Start ButtonBy using a wait block, we can make a touch sensor into a Start Button.
Press Play or Watch on YouTube
|
|
Part 5 - Using a Loop Block to Repeat our ProgramWe want to be able to push our button over and over again so in this video we use a Loop Block to repeat part of our code.
Press Play or Watch on YouTube
|
|
Part 6 - Using a Sensor to End a LoopIn this video I'll show you how to repeat something UNTIL triggered by a sensor to stop. In this case I'll be moving forwards UNTIL we get close to a wall, and then stopping.
Press Play or Watch on YouTube
|
|
Part 7 - Using a Light Sensor to Detect BrightnessJust for fun, lets change our program so that it is started by a light sensor instead of a touch sensor! I'll show you how to change the sensor for our wait block, and how to use your NXT Controller to detect the brightness in your room.
Press Play or Watch on YouTube
|
|
Part 8 - More About Viewing Data from Other Sensors and MotorsIn Part 7 we looked at using the View function to check the ambient brightness. You can use the View function to check all sorts of values!
In this video we look at values for other sensors. Press Play or Watch on YouTube
|
|
3 - More Mindstorms TutorialsThese great tutorials from STEMcentric go over everything you need to know to get started with Mindstorms. I recommend that you watch each video in the Essentials category.
There are also Advanced tutorials which you can check out if you're hungry for more! |
Essential Tutorials
|